basic_knowledge
Basic Knowledge
Kernel Basic
kernel也是一个程序:
- 用来管理软件发出的数据I/O要求;
- 将要求转义为指令;
- 交给CPU和计算机中其他组件处理;
kernel 最主要的功能有两点:
- 控制并与硬件进行交互
- 提供 application 能运行的环境
Ring Model
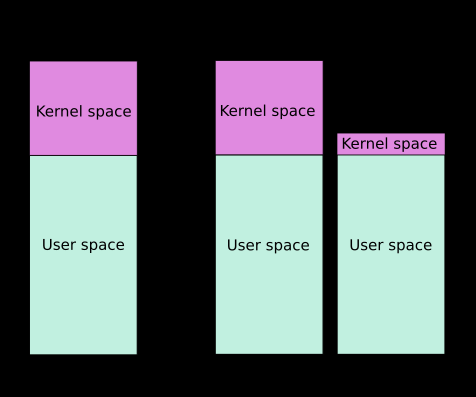
intel CPU 将 CPU 的特权级别分为 4 个级别:Ring 0, Ring 1, Ring 2, Ring 3。
Ring0 只给 OS 使用,Ring 3 所有程序都可以使用,内层 Ring 可以随便使用外层 Ring 的资源。
使用 Ring Model 是为了提升系统安全性,例如某个间谍软件作为一个在 Ring 3 运行的用户程序,在不通知用户的时候打开摄像头会被阻止,因为访问硬件需要使用 being 驱动程序保留的 Ring 1 的方法。
大多数的现代操作系统只使用了 Ring 0 和 Ring 3。
Loadable Kernel Modules(LKMs)
可加载核心模块(内核模块)就像运行在内核空间的可执行程序,包括:
- 驱动程序(Device drivers)
- 设备驱动
- 文件系统驱动
- …
- 内核扩展模块(modules)
LKMs的文件格式和用户态的可执行程序相同,Linux→ELF,Windows→exe/dll,macOS→MACH-O,因此可以用IDA等工具来分析内核模块;
模块可以单独编译,但不能单独运行,运行时链接到内核中,作为内核的一部分在内核空间运行;
大多数CTF中的kernel vulnerability也出现在LKM中;
command
insmod:将指定模块加载到内核中;
rmmod:从内核中卸载指定模块;
lsmod:列出已加载内核模块;
modprobe:添加或删除模块,modprobe在加载模块时会查找依赖关系;
syscall
用户空间的程序请求操作系统内核高权限服务;
ioctl
使用man ioctl 查看手册;
ioctl也是一个系统调用,用于与设备通信;
int ioctl(int fd, unsigned long request, ...); |
第一个参数fd为打开设备返回的文件描述符;
第二个参数为用户程序对设备的控制命令;
后面的参数为补充参数,与设备相关;
使用ioctl使得用户程序可以直接访问设备驱动而不需要知道设备具体细节;
mode changing
user space to kernel space
当发生:
- 系统调用;
- 异常;
- 外设产生中断;
会发生用户态到内核态的切换。
具体的过程为(x86-64):
-
通过
swapgs(Swap GS Base Register)切换GS段寄存器,将GS寄存器值和一个特定位置的值进行交换,目的是保存GS值,同时将该位置的值作为内核执行时的GS值使用;详情见:https://www.felixcloutier.com/x86/swapgs -
将当前栈顶(用户空间栈顶)记录在 CPU 独占变量区域里,将 CPU 独占区域里记录的内核栈顶放入 rsp/esp。
用户栈与内核栈的交换
-
通过 push 保存各寄存器值,代码如下:
 ENTRY(entry_SYSCALL_64)
 /* SWAPGS_UNSAFE_STACK是一个宏,x86直接定义为swapgs指令 */
 SWAPGS_UNSAFE_STACK

 /* 保存栈值,并设置内核栈 */
 movq %rsp, PER_CPU_VAR(rsp_scratch)
 movq PER_CPU_VAR(cpu_current_top_of_stack), %rsp


/* 通过push保存寄存器值,形成一个pt_regs结构 */
/* Construct struct pt_regs on stack */
pushq  $__USER_DS      /* pt_regs->ss */
pushq  PER_CPU_VAR(rsp_scratch)  /* pt_regs->sp */
pushq  %r11             /* pt_regs->flags */
pushq  $__USER_CS      /* pt_regs->cs */
pushq  %rcx             /* pt_regs->ip */
pushq  %rax             /* pt_regs->orig_ax */
pushq  %rdi             /* pt_regs->di */
pushq  %rsi             /* pt_regs->si */
pushq  %rdx             /* pt_regs->dx */
pushq  %rcx tuichu    /* pt_regs->cx */
pushq  $-ENOSYS        /* pt_regs->ax */
pushq  %r8              /* pt_regs->r8 */
pushq  %r9              /* pt_regs->r9 */
pushq  %r10             /* pt_regs->r10 */
pushq  %r11             /* pt_regs->r11 */
sub $(6*8), %rsp /* pt_regs->bp, bx, r12-15 not saved */ -
通过汇编指令判断是否为
x32_abi; -
通过系统调用号,跳到全局变量
sys_call_table相应位置继续执行系统调用。
kernel space to user space
退出时,流程如下:
- 通过
swapgs恢复 GS 值; - 通过
sysretq或者iretq恢复到用户控件继续执行。如果使用iretq还需要给出用户空间的一些信息(CS, eflags/rflags, esp/rsp 等);
struct cred
kernel 记录了进程的权限,更具体的,是用 cred 结构体记录的,每个进程中都有一个 cred 结构,这个结构保存了该进程的权限等信息(uid,gid 等),如果能修改某个进程的 cred,那么也就修改了这个进程的权限。
结构体定义如下:
struct cred { |
kernel function
相比用户态库函数,内核态的函数有了一些变化
- printf() -> printk(),但需要注意的是 printk() 不一定会把内容显示到终端上,但一定在内核缓冲区里,可以通过
dmesg查看效果 - memcpy() ->copy_from_user()/copy_to_user()
- copy_from_user() 实现了将用户空间的数据传送到内核空间;
- copy_to_user() 实现了将内核空间的数据传送到用户空间;
- malloc() -> kmalloc(),内核态的内存分配函数,和 malloc() 相似,但使用的是
slab/slub 分配器 - free() -> kfree(),同 kmalloc()
另外要注意的是,kernel 管理进程,因此 kernel 也记录了进程的权限。kernel 中有两个可以方便的改变权限的函数:
- int commit_creds(struct cred *new)
- struct cred* prepare_kernel_cred(struct task_struct* daemon)
从函数名也可以看出,执行 commit_creds(prepare_kernel_cred(0)) 即可获得 root 权限,0 表示 以 0 号进程作为参考准备新的 credentials。执行 commit_creds(prepare_kernel_cred(0)) 也是最常用的提权手段,两个函数的地址都可以在 /proc/kallsyms 中查看(较老的内核版本中是 /proc/ksyms)
kallsyms
为了更方便的调试内核代码,开发者考虑:将内核代码中所有函数以及所有非栈变量的地址抽取出来,形成是一个简单的数据块(data blob:符号和地址对应),并将此链接进
vmlinux中。完成这一地址抽取+数据快组织封装功能的相关子系统就称之为 kallsyms。
kallsyms抽取了内核用到的所有函数地址(全局的、静态的)和非栈数据变量地址,生成一个数据块,作为只读数据链接进kernel image(vmlinux),相当于内核中存了一个System.map。
反之,如果没有 kallsyms 的帮助,内核只能将十六进制的符号地址呈现给外界,因为它能理解的只有符号地址,并不能显示各种函数名等符号。
因此,在/proc/kallysyms中,可以看到内核中的函数;
第二列是标识,有的符号是大写的,有的是小写。大写的符号是全局的。
b 符号在未初始化数据区(BSS) |
kptr_restrict
关于kptr_restrict,在Document/sysctl/kernel.txt中有如下介绍:
375 │ kptr_restrict: |
kptr_restrict用于控制内核的打印输出;
| kptr_restrict | 权限描述 |
|---|---|
| 2 | 内核将符号地址打印为全0, root和普通用户都没有权限 |
| 1 | root用户有权限读取, 普通用户没有权限 |
| 0 | root和普通用户都可以读取 |
sample如下:
-
当
kptr_restrict为2时,有:# 设置kptr_restrict为2
$ sudo sh -c "echo 2 > kptr_restrict"
$ bat /proc/sys/kernel/kptr_restrict
───────┬──────────────────────────────────────────────────────────────────────────────────────
│ File: /proc/sys/kernel/kptr_restrict
───────┼──────────────────────────────────────────────────────────────────────────────────────
1 │ 2
───────┴──────────────────────────────────────────────────────────────────────────────────────
# root和普通用户状态下地址打印为0
$ cat /proc/kallsyms | grep commit_creds | bat
───────┬──────────────────────────────────────────────────────────────────────────────────────
│ STDIN
───────┼──────────────────────────────────────────────────────────────────────────────────────
1 │ 0000000000000000 T commit_creds
2 │ 0000000000000000 r __ksymtab_commit_creds
3 │ 0000000000000000 r __kstrtab_commit_creds
───────┴──────────────────────────────────────────────────────────────────────────────────────
$ sudo cat /proc/kallsyms | grep commit_creds | bat
───────┬──────────────────────────────────────────────────────────────────────────────────────
│ STDIN
───────┼──────────────────────────────────────────────────────────────────────────────────────
1 │ 0000000000000000 T commit_creds
2 │ 0000000000000000 r __ksymtab_commit_creds
3 │ 0000000000000000 r __kstrtab_commit_creds
───────┴────────────────────────────────────────────────────────────────────────────────────── -
当
kptr_restrict为1时,有:# 设置kptr_restrict为2
$ sudo sh -c "echo 1 > kptr_restrict"
$ sudo bat /proc/sys/kernel/kptr_restrict
───────┬──────────────────────────────────────────────────────────────────────────────────────
│ File: /proc/sys/kernel/kptr_restrict
───────┼──────────────────────────────────────────────────────────────────────────────────────
1 │ 1
───────┴──────────────────────────────────────────────────────────────────────────────────────
# 普通用户状态下地址打印为0
$ cat /proc/kallsyms | grep commit_creds | bat
───────┬──────────────────────────────────────────────────────────────────────────────────────
│ STDIN
───────┼──────────────────────────────────────────────────────────────────────────────────────
1 │ 0000000000000000 T commit_creds
2 │ 0000000000000000 r __ksymtab_commit_creds
3 │ 0000000000000000 r __kstrtab_commit_creds
───────┴──────────────────────────────────────────────────────────────────────────────────────
# root用户可以打印地址
$ sudo cat /proc/kallsyms | grep commit_creds | bat
───────┬──────────────────────────────────────────────────────────────────────────────────────
│ STDIN
───────┼──────────────────────────────────────────────────────────────────────────────────────
1 │ ffffffffb96b4730 T commit_creds
2 │ ffffffffba7c9b20 r __ksymtab_commit_creds
3 │ ffffffffba7ef382 r __kstrtab_commit_creds
───────┴────────────────────────────────────────────────────────────────────────────────────── -
当
kptr_restrict为0时,root用户和普通用户均可以打印出内核函数地址;
dmesg_restrict
dmesg命令用于显示开机信息,其中就包括加载到内核中的驱动等信息;
而dmesg_restrict则是为了限制对这些信息的打印输出;
sample:
$ sudo sysctl -w kernel.dmesg_restrict=1 |
Mitigation
canary, dep, PIE, RELRO 等保护与用户态原理和作用相同
- smep: Supervisor Mode Execution Protection,当处理器处于
ring0模式,执行用户空间的代码会触发页错误。(在 arm 中该保护称为PXN) - smap: Superivisor Mode Access Protection,类似于 smep,通常是在访问数据时。
- mmap_min_addr:
CTF
比赛相关,一般会给以下三个文件
- boot.sh: 一个用于启动 kernel 的 shell 的脚本,多用 qemu,保护措施与 qemu 不同的启动参数有关;
- bzImage: kernel binary;
- rootfs.cpio: 文件系统映像;
关于qemu的启动参数:
解释一下 qemu 启动的参数:
- -initrd rootfs.cpio,使用 rootfs.cpio 作为内核启动的文件系统
- -kernel bzImage,使用 bzImage 作为 kernel 映像
- -cpu kvm64,+smep,设置 CPU 的安全选项,这里开启了 smep
- -m 64M,设置虚拟 RAM 为 64M,默认为 128M 其他的选项可以通过 --help 查看。
本地写好 exploit 后,可以通过 base64 编码等方式把编译好的二进制文件保存到远程目录下,进而拿到 flag。同时可以使用 musl, uclibc 等方法减小 exploit 的体积方便传输。
Exploit Aim
Privilege Escalation
内核提权指普通用户获取到root用户的权限,访问受限资源;
有两种方式:
- 改变自身进程权限;
- 通过影响其他高权限进程来达成目的;
Change Self
前面介绍了cred结构体,内核会通过进程的 task_struct 结构体中的 cred pointer来索引 cred 结构体,然后根据 cred 的内容来判断一个进程拥有的权限,如果 cred 结构体成员中的 uid-fsgid 都为 0,那一般就会认为进程具有 root 权限。
struct cred { |
因此,思路就比较直观了,我们可以通过以下方式来提权
- 直接修改 cred 结构体的内容
- 修改 task_struct 结构体中的 cred 指针指向一个满足要求的 cred
无论是哪一种方法,一般都分为两步:
- 定位;
- 修改;
change cred
location
定位进程cred结构体的位置;
根据定位方法分为:
- 直接定位;
- 间接定位;
直接定位:
cred 结构体的最前面记录了各种 id 信息,对于一个普通的进程而言,uid-fsgid 都是执行进程的用户的身份。因此我们可以通过扫描内存来定位 cred。
在实际定位情况中,会有许多cred满足要求,主要是因为cred会被拷贝、释放。可以利用usage不为0来筛除一些cred,但仍然会发现一些 usage 为 0 的 cred。这是因为 cred 从 usage 为 0, 到释放有一定的时间。此外,cred 是使用 rcu 延迟释放的。
间接定位:
-
task_struct:
进程的
task_struct结构体中会存放指向 cred 的指针,因此我们可以:- 定位当前进程
task_struct结构体的地址; - 根据 cred 指针相对于 task_struct 结构体的偏移计算得出
cred指针存储的地址; - 获取
cred具体的地址;
- 定位当前进程
-
comm:
comm 用来标记可执行文件的名字,位于进程的
task_struct结构体中。我们可以发现 comm 其实在 cred 的正下方,所以我们也可以先定位 comm ,然后定位 cred 的地址。然而,在进程名字并不特殊的情况下,内核中可能会有多个同样的字符串,这会影响搜索的正确性与效率。因此,我们可以使用 prctl 设置进程的 comm 为一个特殊的字符串,然后再开始定位 comm。
/* Process credentials: */
/* Tracer's credentials at attach: */
const struct cred __rcu *ptracer_cred;
/* Objective and real subjective task credentials (COW): */
const struct cred __rcu *real_cred;
/* Effective (overridable) subjective task credentials (COW): */
const struct cred __rcu *cred;
/* Cached requested key. */
struct key *cached_requested_key;
/*
* executable name, excluding path.
*
* - normally initialized setup_new_exec()
* - access it with [gs]et_task_comm()
* - lock it with task_lock()
*/
char comm[TASK_COMM_LEN]; -
UAF使用相同堆块
虽然我们确实想要修改 cred 的内容,但是不一定非得知道 cred 的具体位置,我们只需要能够修改 cred 即可。
如果我们在进程初始化时能控制 cred 结构体的位置,并且我们可以在初始化后修改该部分的内容,那么我们就可以很容易地达到提权的目的。这里给出一个典型的例子:
- 申请一块与 cred 结构体大小一样的堆块;
- 释放该堆块;
- fork 出新进程,恰好使用刚刚释放的堆块;
- 此时,修改 cred 结构体特定内存,从而提权;
不需要任何信息泄露;
modify
在这种方法下,我们可以直接将 cred 中的 uid-fsgid 都修改为 0。当然修改的方式有很多种,比如说
- 在我们具有任意地址读写后,可以直接修改 cred。
- 在我们可以 ROP 执行代码后,可以利用 ROP gadget 修改 cred。
change cred pointer
cred指针没有什么特殊的地方,很难通过直接定位方式定位到cred指针;
location
task_struct
因此仍然利用task_struct结构体,定位其中存放的cred pointer;
- 定位当前进程
task_struct结构体的地址; - 根据 cred 指针相对于 task_struct 结构体的偏移计算得出
cred指针存储的地址;
comm
comm 用来标记可执行文件的名字,位于进程的 task_struct 结构体中。我们可以发现 comm 其实在 cred 指针的正下方,所以我们也可以先定位 comm ,然后定位 cred 指针的地址。然而,在进程名字并不特殊的情况下,内核中可能会有多个同样的字符串,这会影响搜索的正确性与效率。因此,我们可以使用 prctl 设置进程的 comm 为一个特殊的字符串,然后再开始定位 comm。
commit_creds
我们还可以使用commit_creds(prepare_kernel_cred(0))来进行提权,该方式会自动生成一个合法的 cred,并定位当前线程的 task_struct 的位置,然后修改它的 cred 为新的 cred。该方式比较适用于控制程序执行流后使用。
modify
在具体修改时,我们可以使用如下的两种方式:
- 修改 cred 指针为内核镜像中已有的 init_cred 的地址。这种方法适合于我们能够:
- 直接修改 cred 指针;
- init_cred 地址已知;
- 伪造一个 cred,然后修改 cred 指针指向该地址即可。这种方式比较麻烦,一般并不使用。
Change Others
如果我们可以改变特权进程的执行轨迹,也可以实现提权。从以下角度来考虑如何改变特权进程的执行轨迹:
- 改数据;
- 改代码;
change data
symbol link
如果一个 root 权限的进程会执行一个符号链接的程序,并且该符号链接或者符号链接指向的程序可以由攻击者控制,攻击者就可以实现提权。
call_usermodehelper
call_usermodehelper 是一种内核线程执行用户态应用的方式,并且启动的进程具有 root 权限。因此,如果我们能够控制具体要执行的应用,那就可以实现提权。在内核中,call_usermodehelper 具体要执行的应用往往是由某个变量指定的,因此我们只需要想办法修改掉这个变量即可。不难看出,这是一种典型的数据流攻击方法。一般常用的主要有以下几种方式:
modify modprobe_path
- 获取 modprobe_path 的地址。
- 修改 modprobe_path 为指定的程序。
- 触发执行
call_modprobe,从而实现提权 。这里我们可以利用以下几种方式来触发- 执行一个非法的可执行文件。非法的可执行文件需要满足相应的要求(参考 call_usermodehelper 部分的介绍)。
- 使用未知协议来触发。
模板如下:
// step 1. modify modprobe_path to the target value |
如何定位modprobe_path呢?
直接定位:由于 modprobe_path 的取值是确定的,所以我们可以直接扫描内存,寻找对应的字符串。这需要我们具有扫描内存的能力。
间接定位:考虑到 modprobe_path 相对于内核基地址的偏移是固定的,我们可以先获取到内核的基地址,然后根据相对偏移来得到 modprobe_path 的地址。
modify poweroff_cmd
- 修改
poweroff_cmd为指定的程序。 - 劫持控制流执行
__orderly_poweroff。
定位方法类似于定位modprobe_path的方法;
change code
在程序运行时,如果我们可以修改 root 权限进程执行的代码,也可以实现提权。
modify vDSO
内核中 vDSO 的代码会被映射到所有的用户态进程中。如果有一个高特权的进程会周期性地调用 vDSO 中的函数,那我们可以考虑把 vDSO 中相应的函数修改为特定的 shellcode。当高权限的进程执行相应的代码时,我们就可以进行提权。
在早期的时候,Linux 中的 vDSO 是可写的,考虑到这样的风险,Kees Cook 提出引入 post-init read-only 的数据,即,将那些初始化后不再被写的数据标记为只读,来防御这样的利用。
在引入之前,vDSO 对应的 raw_data 只是标记了对齐属性,如下:
fprintf(outfile, "/* AUTOMATICALLY GENERATED -- DO NOT EDIT */\n\n"); |
引入之后,vDSO 对应的 raw_data 则被标记为了初始化后只读。
fprintf(outfile, "/* AUTOMATICALLY GENERATED -- DO NOT EDIT */\n\n"); |
通过修改 vDSO 进行提权的基本方式如下
- 定位 vDSO
- 修改 vDSO 的特定函数为指定的 shellcode
- 等待触发执行 shellcode
定位方式:
-
IDA定位:在 vmlinux 中找到 vDSO 的位置;
-
在 ida 里定位
init_vdso函数的地址;__int64 init_vdso()
{
init_vdso_image(&vdso_image_64 + 0x20000000);
init_vdso_image(&vdso_image_x32 + 0x20000000);
cpu_maps_update_begin();
on_each_cpu((char *)startup_64 + 0x100003EA0LL, 0LL, 1LL);
_register_cpu_notifier(&sdata + 536882764);
cpu_maps_update_done();
return 0LL;
} -
可以看到
vdso_image_64和vdso_image_x32。以vdso_image_64为例,点到该变量的地址;.rodata:FFFFFFFF81A01300 public vdso_image_64
.rodata:FFFFFFFF81A01300 vdso_image_64 dq offset raw_data ; DATA XREF: arch_setup_additional_pages+18↑o
.rodata:FFFFFFFF81A01300 ; init_vdso+1↓o -
点击
raw_data即可知道 64 位 vDSO 在内核镜像中的地址,可以看到,vDSO 确实是以页对齐的。.data:FFFFFFFF81E04000 raw_data db 7Fh ; ; DATA XREF: .rodata:vdso_image_64↑o
.data:FFFFFFFF81E04001 db 45h ; E
.data:FFFFFFFF81E04002 db 4Ch ; L
.data:FFFFFFFF81E04003 db 46h ; F从最后的符号来看,我们也可以直接使用
raw_data来寻找 vDSO。
-
-
内存定位
-
直接定位
vDSO 其实是一个 ELF 文件,具有 ELF 文件头。同时,vDSO 中特定位置存储着导出函数的字符串。因此我们可以根据这两个特征来扫描内存,定位 vDSO 的位置。
-
间接定位
考虑到 vDSO 相对于内核基地址的偏移是固定的,我们可以先获取到内核的基地址,然后根据相对偏移来得到 vDSO 的地址。
-
Information Disclosure
泄露敏感信息,这一点需要我们具有读取内核数据的能力。具体想要泄漏什么数据与利用场景紧密相关。
DoS
对内核进行DoS相对容易,可以通过以下方式实现:
- 触发内核中的某个漏洞让内核崩溃;
- 触发内核中的死锁;
- 触发大量的内核内存泄漏,即存在大量的内存被申请但是没有被释放;
Defense
Isolation
在内核的防御机制中,根据隔离的主体,我们将隔离分为两种:
- 内核态和用户态的隔离
- 内核自身内部不同对象间的隔离
user&kernel space
主要方式有:
这里主要有
- 默认:用户态不可直接访问内核态的数据、执行内核态的代码
- KASLR:内核地址空间随机分布
- SMEP:内核态不可执行用户态的代码
- SMAP:内核态不可访问用户态的数据
- KPTI:用户态不可看到内核态的页表,内核态不可执行用户态的代码(模拟)
x86-SMEP
用户代码不可执行,Supervisor Mode Execution Protection。
起初,在内核态执行代码时,可以直接执行用户态的代码。那如果攻击者控制了内核中的执行流,就可以执行处于用户态的代码。由于用户态的代码是攻击者可控的,所以更容易实施攻击。为了防范这种攻击,研究者提出当位于内核态时,不能执行用户态的代码。在 Linux 内核中,这个防御措施的实现是与指令集架构相关的。
CR4-20
CR4寄存器,第五号Control Register中的第20位用来标记是否开启SMEP保护;

open&close
开启:默认情况下,SMEP 保护是开启的。如果是使用 qemu 启动的内核,我们可以在 -append 选项中添加 +smep 来开启 SMEP。
关闭:在 /etc/default/grub 的如下两行中添加 nosmep:
GRUB_CMDLINE_LINUX_DEFAULT="quiet" |
然后运行 update-grub 并且重启系统就可以关闭 smep。
如果是使用 qemu 启动的内核,我们可以在 -append 选项中添加 nosmep 来关闭 SMEP。
lookup status
通过如下命令可以检查 SMEP 是否开启,如果发现了 smep 字符串就说明开启了 smep 保护,否则没有开启。
grep smep /proc/cpuinfo |
attack SMEP
把 CR4 寄存器中的第 20 位置为 0 后,我们就可以执行用户态的代码。一般而言,我们会使用 0x6f0 来设置 CR4,这样 SMAP 和 SMEP 都会被关闭。
内核中修改 cr4 的代码最终会调用到 native_write_cr4,当我们能够劫持控制流后,我们可以执行内核中的 gadget 来修改 CR4。从另外一个维度来看,内核中存在固定的修改 cr4 的代码,比如在 refresh_pce 函数、set_tsc_mode 等函数里都有。
arm-PXN
x86-SMAP
用户数据不可访问,Supervisor Mode Access Protection;
如果内核态可以访问用户态的数据,也会出现问题。比如在劫持控制流后,攻击者可以通过栈迁移将栈迁移到用户态,然后进行 ROP,进一步达到提权的目的。在 Linux 内核中,这个防御措施的实现是与指令集架构相关的。
CR4-21
CR4 寄存器中的第 21 位用来标记是否开启 SMEP 保护;

open&close
开启:默认情况下,SMAP 保护是开启的。如果是使用 qemu 启动的内核,我们可以在 -append 选项中添加 +smap 来开启 SMAP。
关闭:在 /etc/default/grub 的如下两行中添加 nosmap
GRUB_CMDLINE_LINUX_DEFAULT="quiet" |
然后运行 update-grub ,重启系统就可以关闭 smap。
如果是使用 qemu 启动的内核,我们可以在 -append 选项中添加 nosmap 来关闭 SMAP。
lookup status
通过如下命令可以检查 SMAP 是否开启,如果发现了 smap 字符串就说明开启了 smap 保护,否则没有开启。
grep smap /proc/cpuinfo |
attack SMAP
设置 CR4 寄存器
把 CR4 寄存器中的第 21 位置为 0 后,我们就可以访问用户态的数据。一般而言,我们会使用 0x6f0 来设置 CR4,这样 SMAP 和 SMEP 都会被关闭。
内核中修改 cr4 的代码最终会调用到 native_write_cr4,当我们能够劫持控制流后,我们就可以执行内核中对应的 gadget 来修改 CR4。从另外一个维度来看,内核中存在固定的修改 cr4 的代码,比如在 refresh_pce 函数、set_tsc_mode 等函数里都有。
copy_from/to_user
在劫持控制流后,攻击者可以调用 copy_from_user 和 copy_to_user 来访问用户态的内存。这两个函数会临时清空禁止访问用户态内存的标志。
KPTI
Kernel Page Table Isolation最初目的是为了缓解KASLR的绕过以及CPU侧信道攻击;
在KPTI机制中,内核态空间的内存和用户态空间的内存进行了更强的隔离;
-
内核态中的页表包括用户空间内存的页表和内核空间内存的页表。
-
用户态的页表只包括用户空间内存的页表以及必要的内核空间内存的页表(处理系统调用、终端信息的内存)

在 x86_64 的 KPTI 机制中,内核态的用户空间内存映射部分被全部标记为不可执行NX。也就是说,之前不具有 SMEP 特性的硬件,如果开启了 KPTI 保护,也具有了类似于 SMEP 的特性。此外,SMAP 模拟也可以以类似的方式引入,只是现在还没有引入。因此,在目前开启了 KPTI 保护的内核中,如果没有开启 SMAP 保护,那么内核仍然可以访问用户态空间的内存,只是不能跳转到用户态空间执行 Shellcode。
Linux 4.15 中引入了 KPTI 机制,并且该机制被反向移植到了 Linux 4.14.11,4.9.75,4.4.110。
open&close
open:如果是使用 qemu 启动的内核,我们可以在 -append 选项中添加 kpti=1 来开启 KPTI。
close:如果是使用 qemu 启动的内核,我们可以在 -append 选项中添加 nopti 来关闭 KPTI。
lookup status
我们可以通过以下两种方式来查看 KPTI 机制是否开启。
dmesg | grep 'page table' |
attack KPTI
KPTI 机制和 SMAP 、SMEP 不太一样,由于与源码紧密结合,似乎没有办法在运行时刻关闭。
攻击方法有:
-
修改页表
在开启 KPTI 后,用户态空间的所有数据都被标记了 NX 权限,但是,我们可以考虑修改对应的页表权限,使其拥有可执行权限。当内核没有开启 smep 权限时,我们在修改了页表权限后就可以返回到用户态,并执行用户态的代码。 -
SWITCH_TO_USER_CR3_STACK
在开启 KPTI 机制后,用户态进入到内核态时,会进行页表切换;当从内核态恢复到用户态时,也会进行页表切换。那么如果我们可以控制内核执行返回用户态时所执行的切换页表的代码片段,也就可以正常地返回到用户态。通过分析内核态到用户态切换的代码,我们可以得知,页表的切换主要靠SWITCH_TO_USER_CR3_STACK汇编宏。因此,我们只需要能够调用这部分代码即可。.macro SWITCH_TO_USER_CR3_STACK scratch_reg:req
pushq %rax
SWITCH_TO_USER_CR3_NOSTACK scratch_reg=\scratch_reg scratch_reg2=%rax
popq %rax
.endm
.macro SWITCH_TO_USER_CR3_NOSTACK scratch_reg:req scratch_reg2:req
ALTERNATIVE "jmp .Lend_\@", "", X86_FEATURE_PTI
mov %cr3, \scratch_reg
ALTERNATIVE "jmp .Lwrcr3_\@", "", X86_FEATURE_PCID
/*
* Test if the ASID needs a flush.
*/
movq \scratch_reg, \scratch_reg2
andq $(0x7FF), \scratch_reg /* mask ASID */
bt \scratch_reg, THIS_CPU_user_pcid_flush_mask
jnc .Lnoflush_\@
/* Flush needed, clear the bit */
btr \scratch_reg, THIS_CPU_user_pcid_flush_mask
movq \scratch_reg2, \scratch_reg
jmp .Lwrcr3_pcid_\@
.Lnoflush_\@:
movq \scratch_reg2, \scratch_reg
SET_NOFLUSH_BIT \scratch_reg
.Lwrcr3_pcid_\@:
/* Flip the ASID to the user version */
orq $(PTI_USER_PCID_MASK), \scratch_reg
.Lwrcr3_\@:
/* Flip the PGD to the user version */
orq $(PTI_USER_PGTABLE_MASK), \scratch_reg
mov \scratch_reg, %cr3
.Lend_\@:
.endm
事实上,我们不仅希望切换页表,还希望能够返回到用户态,因此我们这里也需要复用内核中返回至用户态的代码。内核返回到用户态主要有两种方式:iret 和 sysret。下面详细介绍:
iret
SYM_INNER_LABEL(swapgs_restore_regs_and_return_to_usermode, SYM_L_GLOBAL) |
可以看到,通过伪造如下的栈,然后跳转到 movq %rsp, %rdi,我们就可以同时切换页表和返回至用户态。
fake rax |
sysret
在使用 sysret 时,我们首先需要确保 rcx 和 r11 为如下的取值
rcx, save the rip of the code to be executed when returning to userspace |
然后构造如下的栈
fake rdi |
最后跳转至 entry_SYSCALL_64 的如下代码,即可返回到用户态。
SWITCH_TO_USER_CR3_STACK scratch_reg=%rdi |
signal handler
我们也可以考虑在用户态注册 signal handler 来执行位于用户态的代码。在这种方式下,我们无需切换页表。
inside kernel
chunk isolaiton
根据描述,如果在使用 kmem_cache_create 创建一个 cache 时,传递了 SLAB_ACCOUNT 标记,那么这个 cache 就会单独存在,不会与其它相同大小的 cache 合并。
Currently, if we want to account all objects of a particular kmem cache, |
在早期,许多结构体(如 cred 结构体)对应的堆块并不单独存在,会和相同大小的堆块使用相同的 cache。在 Linux 4.5 版本引入了这个 flag 后,许多结构体就单独使用了自己的 cache。然而,根据上面的描述,这一特性似乎最初并不是为了安全性引入的。
Mark those kmem allocations that are known to be easily triggered from |
Access Control
访问控制是指内核通过对某些对象添加访问控制,使得内核中相应的对象具有一定的访问控制要求,比如不可写,或者不可读;
dmesg_struct
考虑到内核日志中可能会有一些地址信息或者敏感信息,研究者提出需要对内核日志的访问进行限制。
该选项用于控制是否可以使用 dmesg 来查看内核日志。当 dmesg_restrict 为 0 时,没有任何限制;当该选项为 1 时,只有具有 CAP_SYSLOG 权限的用户才可以通过 dmesg 命令来查看内核日志。
dmesg_restrict: |
kptr_restrict
该选项用于控制在输出内核地址时施加的限制,主要限制以下接口
- 通过 /proc 获取的内核地址
- 通过其它接口(有待研究)获取的地址
具体输出的内容与该选项配置的值有关
- 0:默认情况下,没有任何限制。
- 1:使用
%pK输出的内核指针地址将被替换为 0,除非用户具有 CAP_ SYSLOG 特权,并且 group id 和真正的 id 相等。 - 2:使用
%pK输出的内核指针都将被替换为 0 ,即与权限无关。
kptr_restrict: |
当开启该保护后,攻击者就不能通过 /proc/kallsyms 来获取内核中某些敏感的地址了,如 commit_creds、prepare_kernel_cred。
Detection
kernel stack canary
在 Linux 内核中,Canary 的实现是与架构相关的;
在编译内核时,我们可以设置 CONFIG_CC_STACKPROTECTOR 选项,来开启该保护。
x86
在 x86 架构中,同一个 task 中的系统调用使用相同的 Canary,因此只要泄露了一次系统调用中的canary,同一task的其他系统调用中的canary也都被泄露了;
randomization
增加内核的随机性来提高安全性;
kalsr
以段为单位进行整体偏移的内核地址随机化;
如果是使用 qemu 启动的内核,我们可以在 -append 选项中添加 kaslr 来开启 KASLR。
如果是使用 qemu 启动的内核,我们可以在 -append 选项中添加 nokaslr 来关闭 KASLR。
通过泄漏内核某个段的地址,就可以得到这个段内的所有地址。比如当我们泄漏了内核的代码段地址,就知道内核代码段的所有地址。
fgkaslr
鉴于 KASLR 的不足,有研究者实现了 FGKASLR。FGKASLR 在 KASLR 基地址随机化的基础上,在加载时刻,以函数粒度重新排布内核代码,主要在两个部分进行了修改。目前,FGKASLR 只支持 x86_64 架构。
编译阶段
FGKASLR 利用 gcc 的编译选项 -ffunction-sections 把内核中不同的函数放到不同的 section 中。 在编译的过程中,任何使用 C 语言编写的函数以及不在特殊输入节的函数都会单独作为一个节;使用汇编编写的代码会位于一个统一的节中。
编译后的 vmlinux 保留了所有的节区头(Section Headers),以便于知道每个函数的地址范围。同时,FGKASLR 还有一个重定位地址的扩展表。通过这两组信息,内核在解压缩后就可以乱序排列函数。
最后的 binary 的第一个段包含了一个合并节(由若干个函数合并而成)、以及若干其它单独构成一个节的函数。
加载阶段
在解压内核后,会首先检查保留的符号信息,然后寻找需要随机化的 .text.* 节区。其中,第一个合并的节区 (.text) 会被跳过,不会被随机化。后面节区的地址会被随机化,但仍然会与 .text 节区相邻。同时,FGKASLR 修改了已有的用于更新重定位地址的代码,不仅考虑了相对于加载地址的偏移,还考虑了函数节区要被移动到的位置。
为了隐藏新的内存布局,/proc/kallsyms 中符号使用随机的顺序来排列。在 v4 版本之前,该文件中的符号按照字母序排列。
通过分析代码,我们可以知道,在 layout_randomized_image 函数中计算了最终会随机化的节区,存储在 sections 里。
/* |
可以看到,只有同时满足以下条件的节区才会参与随机化
- 节区名以 .text 开头
- section flags 中包含
SHF_ALLOC - section flags 中包含
SHF_EXECINSTR
因此,通过以下命令,我们可以知道
- __ksymtab 不会参与随机化
- .data 不会参与随机化
> readelf --section-headers -W vmlinux| grep -vE " .text|AX" |
Exploit Method
Kernel UAF
Kernel ROP
ret2usr
bypass-SMEP
Double-Fetch
double-fetch从漏洞原理上属于条件竞争漏洞,是一种内核态与用户态之间的数据访问竞争。
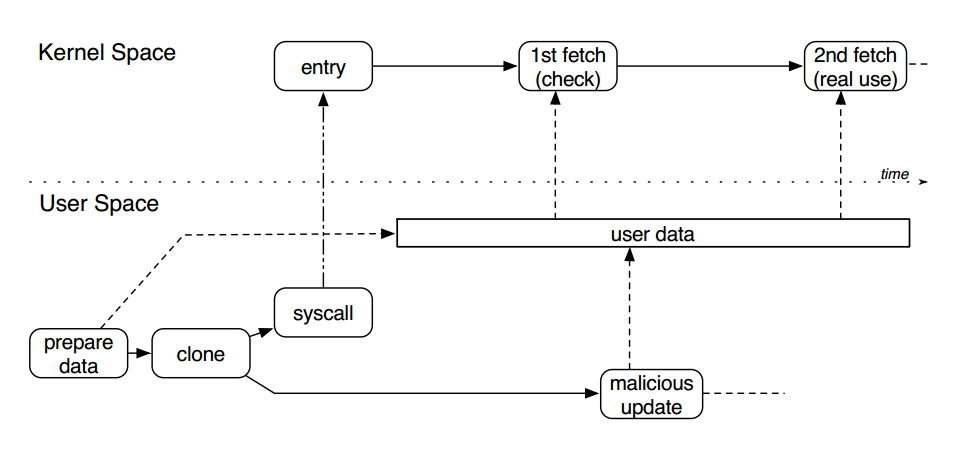
在 Linux 等现代操作系统中,虚拟内存地址通常被划分为内核空间和用户空间。内核空间负责运行内核代码、驱动模块代码等,权限较高。而用户空间运行用户代码,并通过系统调用进入内核完成相关功能。通常情况下,用户空间向内核传递数据时,内核先通过通过 copy_from_user 等拷贝函数将用户数据拷贝至内核空间进行校验及相关处理,但在输入数据较为复杂时,内核可能只引用其指针,而将数据暂时保存在用户空间进行后续处理。此时,该数据存在被其他恶意线程篡改风险,造成内核验证通过数据与实际使用数据不一致,导致内核代码执行异常。
一个典型的 Double Fetch 漏洞原理如下图所示,一个用户态线程准备数据并通过系统调用进入内核,该数据在内核中有两次被取用,内核第一次取用数据进行安全检查(如缓冲区大小、指针可用性等),当检查通过后内核第二次取用数据进行实际处理。而在两次取用数据之间,另一个用户态线程可创造条件竞争,对已通过检查的用户态数据进行篡改,在真实使用时造成访问越界或缓冲区溢出,最终导致内核崩溃或权限提升。

