Linux kernel source(2):Kernel Boot
Linux kernel source(2):kernel boot
引导
按下电源开关:
CPU
CPU初始化,实模式下运行,首先执行0xfffffff0地址的内容,是一个跳转,跳转到BIOS;
BIOS
BIOS初始化,检查硬件状态,寻找可引导设备,跳转到引导扇区;
- 定位主引导扇区(数据446bytes,0xaa55结束)
- MBR分区,初始化,把第一个扇区的内容加载到内存
0x7c00处,即bootloader处,跳转执行;
BootLoader
GRUB2是一种BootLoader;
- BootLoader执行
boot.img; boot.img跳转到GRUB2的diskboot.img,加载内核代码和文件系统到内存;GRUB2运行grub_main函数,初始化控制台,加载配置文件,设置root设备,加载模块,切换为normal模式;normal模式调用grub_normal_execute完成最后的准备工作,显示可用操作系统菜单;- 用户选择后,调用
grub_menu_execute_entry,运行boot命令,引导操作系统到内存中;
物理内存布局
| Protected-mode kernel | |
实模式到保护模式
执行内存中的内核代码;
入口_start
.globl _start |
kernel入口是arch/x86/header.S的_start,第一条指令便是一个短跳转,跳转到start_of_setup;
初始化start_of_setup
start_of_setup: |
可以看到,start_of_setup将段寄存器初始化,并且初始化了堆栈和bss段,最后调用main函数,其处在arch/x86/boot/main.c;
主体流程main
void main(void) |
main函数所做的工作由:
-
copy_boot_params-
把
header.S中的hdr拷贝到boot_params中,所谓的第零页;memcpy(&boot_params.hdr, &hdr, sizeof(hdr));
-
如果
kernel用的是旧的命令行协议,,则更新为kernel的命令行;if (!boot_params.hdr.cmd_line_ptr &&
oldcmd->cl_magic == OLD_CL_MAGIC) {
/* Old-style command line protocol. */
u16 cmdline_seg;
/* Figure out if the command line falls in the region
of memory that an old kernel would have copied up
to 0x90000... */
if (oldcmd->cl_offset < boot_params.hdr.setup_move_size)
cmdline_seg = ds();
else
cmdline_seg = 0x9000;
boot_params.hdr.cmd_line_ptr =
(cmdline_seg << 4) + oldcmd->cl_offset;
}
-
-
console_init-
初始化控制台
void console_init(void)
{
	parse_earlyprintk();

	if (!early_serial_base)
		parse_console_uart8250();
}
-
-
init_heap-
初始化堆,x
static void init_heap(void)
{
	char *stack_end;

	if (boot_params.hdr.loadflags & CAN_USE_HEAP) {   // 判断堆是否可用
		asm("leal %P1(%%esp),%0"
		    : "=r" (stack_end) : "i" (-STACK_SIZE));

		heap_end = (char *)     // 堆结束的地址
			((size_t)boot_params.hdr.heap_end_ptr + 0x200);
		if (heap_end > stack_end)   // 如果堆结束地址大于栈结束地址,则堆结束地址等于栈结束地址
			heap_end = stack_end;
	} else {                          // boot协议不匹配,堆不可用,打印信息
		/* Boot protocol 2.00 only, no heap available */
		puts("WARNING: Ancient bootloader, some functionality "
		     "may be limited!\n");
	}
}
-
-
validate_cpu-
检查CPU支持状态
if (validate_cpu()) {
	puts("Unable to boot - please use a kernel appropriate "
	     "for your CPU.\n");
	die();
}
调用了
validate_cpu来检查;int validate_cpu(void)
{
u32 *err_flags;
int cpu_level, req_level;
check_cpu(&cpu_level, &req_level, &err_flags); // 检查并获取cpu的几个标志位
if (cpu_level < req_level) { // 如果cpu_level < req_level,即cpu特权级小于请求等级
printf("This kernel requires an %s CPU, ",
cpu_name(req_level)); // 打印内核需要的CPU请求等级
printf("but only detected an %s CPU.\n",
cpu_name(cpu_level)); // 打印当前CPU的特权等级
return -1; // 返回-1代表检查成功但CPU不支持kernel
}
if (err_flags) {
puts("This kernel requires the following features "
"not present on the CPU:\n");
show_cap_strs(err_flags); // 如果存在错误,则打印错误的信息,表示CPu功能不足
putchar('\n');
return -1;
} else if (check_knl_erratum()) {
// 检查Intel的信息,检查cpu的family和model,检查是否是64bit,或者32bit下是否开启了PAE(物理地址扩展)
return -1;
} else {
return 0;
}
}
-
-
set_bios_mode-
设置BIOS模式为x86_64的模式;
static void set_bios_mode(void)
{
struct biosregs ireg;
// 此时还是实模式,intcall是初始化阶段的中断处理函数,BIOS的寄存器设置成ireg变量
initregs(&ireg);
ireg.ax = 0xec00;
ireg.bx = 2;
intcall(0x15, &ireg, NULL);
}
-
-
detect_memory-
内存探测,从BIOS手机物理内存信息,包括物理内存的起始地址,段大小,内存段类型;
void detect_memory(void)
{
	detect_memory_e820();

	detect_memory_e801();

	detect_memory_88();
}在ucore的实验中,涉及到了地址探测的问题,具体参考我的另一篇文章,之后有空再补到这上面;
-
-
keyboard_init-
字面意思,对键盘的初始化;
static void keyboard_init(void)
{
	struct biosregs ireg, oreg;
	initregs(&ireg);

	ireg.ah = 0x02;		/* Get keyboard status */
	intcall(0x16, &ireg, &oreg);
	boot_params.kbd_status = oreg.al;

	ireg.ax = 0x0305;	/* Set keyboard repeat rate */
	intcall(0x16, &ireg, NULL);
}
-
-
query_ist-
获取BIOS中的其它信息包括机器型号、BIOS版本、高级电池管理等;
static void query_ist(void)
{
	struct biosregs ireg, oreg;

	/* Some older BIOSes apparently crash on this call, so filter
	   it from machines too old to have SpeedStep at all. */
	if (cpu.level < 6)
		return;

	initregs(&ireg);
	ireg.ax  = 0xe980;	 /* IST Support */
	ireg.edx = 0x47534943;	 /* Request value */
	intcall(0x15, &ireg, &oreg);

	boot_params.ist_info.signature  = oreg.eax;
	boot_params.ist_info.command    = oreg.ebx;
	boot_params.ist_info.event      = oreg.ecx;
	boot_params.ist_info.perf_level = oreg.edx;
}
可以发现很多都是靠
header.S中设置好的寄存器参数来传递参数,并且进行中断处理;
-
-
如果设置了APM和EDD模式,则还会查询相关的信息;
-
set_video-
设置显示模式;
void set_video(void)
{
	u16 mode = boot_params.hdr.vid_mode;

	RESET_HEAP();          // 重设堆, heap=_end

	store_mode_params();   // 存储当前模式的参数信息
	save_screen();      // 保存信息
	probe_cards(0);    // 探测视频驱动程序,生成模式列表

	for (;;) {   // 对应模式
		if (mode == ASK_VGA)
			mode = mode_menu();

		if (!set_mode(mode))
			break;

		printf("Undefined video mode number: %x\n", mode);
		mode = ASK_VGA; // 默认
	}
	boot_params.hdr.vid_mode = mode;
	vesa_store_edid();
	store_mode_params();

	if (do_restore)
		restore_screen();
}
-
-
go_to_protected_mode-
启动保护模式
void go_to_protected_mode(void)
{
	/* Hook before leaving real mode, also disables interrupts */
	realmode_switch_hook();   // 禁止中断功能

	/* Enable the A20 gate */
	if (enable_a20()) {   // 开启a20标志位
		puts("A20 gate not responding, unable to boot...\n");
		die();
	}

	/* Reset coprocessor (IGNNE#) */
	reset_coprocessor();   // 重新设置协处理器

	/* Mask all interrupts in the PIC */
	mask_all_interrupts();  // 屏蔽辅助PIC(可编程中断控制器)和主要PIC上的所有中断

	/* Actual transition to protected mode... */
	setup_idt();   // 设置中断描述符表(IDT)
	setup_gdt();   // 设置全局描述符表
	protected_mode_jump(boot_params.hdr.code32_start, // code32_start是保护模式入口点的地址,进行跳转
			    (u32)&boot_params + (ds() << 4));   // arch/x86/boot/pmjump.S
}-
setup_iditstatic void setup_idt(void)
{
static const struct gdt_ptr null_idt = {0, 0};
asm volatile("lidtl %0" : : "m" (null_idt));
}null_idt为空,使用lidt将null_idt加载入idt寄存器; -
setup_gdt/* CS: code, read/execute, 4 GB, base 0 */
[GDT_ENTRY_BOOT_CS] = GDT_ENTRY(0xc09b, 0, 0xfffff),
/* DS: data, read/write, 4 GB, base 0 */
[GDT_ENTRY_BOOT_DS] = GDT_ENTRY(0xc093, 0, 0xfffff),
/* TSS: 32-bit tss, 104 bytes, base 4096 */
/* We only have a TSS here to keep Intel VT happy;
we don't actually use it for anything. */
[GDT_ENTRY_BOOT_TSS] = GDT_ENTRY(0x0089, 4096, 103),-
使用
boot_gdt[]数组存储gdt全局表,初始化CS,DS,TSS表项; -
使用
static struct gdt_ptr gdt存储gdt全局表大小与地址; -
使用
lgdt将gdt_ptr加载如gdt寄存器;
-
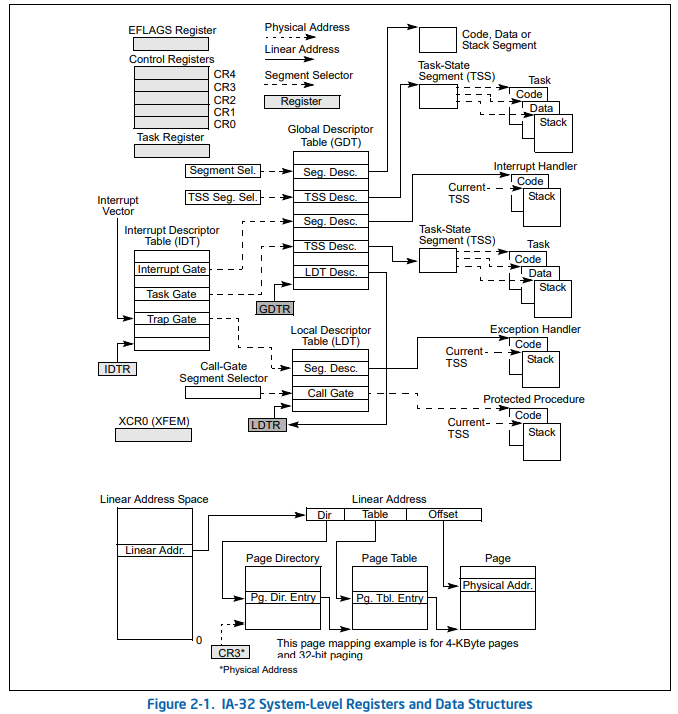
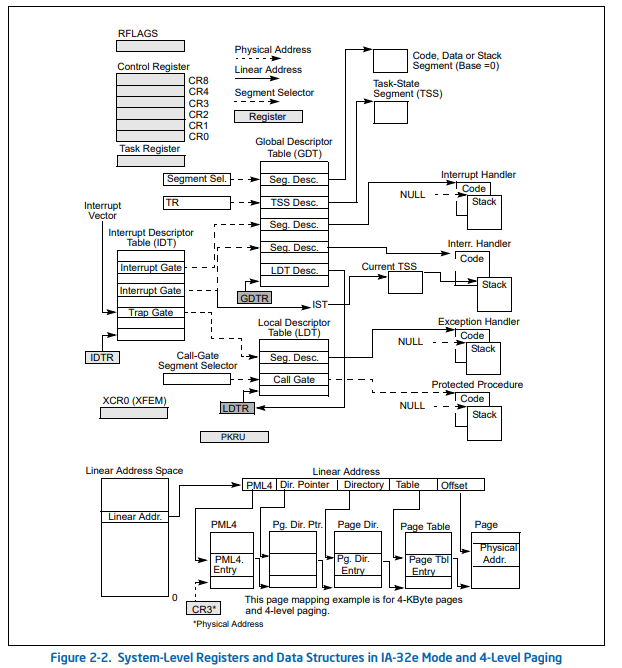
关于涉及到的几个描述符表;
- 任务状态描述符表
TSS记录当前进程执行时所对应的寄存器的数据,这些数据主要在进程切换时发挥作用。比如,现在要由当前进程A切换到进程B,那么系统就要将此时各个寄存器的数值保存在进程A的任务状态描述符表中,以便将来进程A再次执行时接着使用而不至于出现混乱;之后,再用进程B中TSS里面的寄存器值来设置相应的寄存器,以此支持进程B接下来的执行。 - 局部数据描述符表
LDT中,记录着当前进程对应程序的代码段和数据段信息,比如代码的基地址等,这些信息将在进程程序执行时提供支持。 - 系统将来就是通过全局描述符表
GDT表中挂接的TSS描述符和LDT描述符,来与当前进程建立关系的。这里将TSS和LDT挂接在全局描述符表GDT中,标志着系统从此具备操作进程的能力;
两个概念图


执行结束后,会跳转到
arch/x86/boot/pmjump.S上,保护模式打开; -
-
64bit
跳转后执行,CPU检查是否支持64bit,然后初始化boot page table,最后切换到64bit,其引导在arch/x86/boot/compressed/head_64.S下;
内核启动
解压kernel并重定位,函数startup_64开始执行;
