Unit1 - Your First Android App
Unit 1:Your First Android App
Course goals
- Understand the fundamentals of Kotlin and Jetpack Compose
- Build a series of basic Android apps
- Use Android app architecture, Jetpack libraries and work with data according to Modern Android Development practices
Prerequisites
- Basic computer skills
- Basic math skills
- A computer that can run Android Studio
- (Optional) Android device
Unit 1: Your first Android app
Introduction to Kotlin
Print Message
fun main() { |
Fix compile error
fun main() { |
String templates
fun main() { |
Fix:
fun main() { |
String concatenation
fun main() { |
Fix:
fun main() { |
Message formatting
fun main() { |
Implement basic math operations
Step1
fun main() { |
Fix
fun main() { |
Step2
fun main() { |
Step 3
Now you have a reusable function to add two numbers.
- Can you implement the
subtract()function the same way you implemented theadd()function? Modify themain()function as well to use thesubtract()function so you can verify that it works as expected.
Hint: Think about the difference between addition, subtraction and other math operations. Start work on the solution code from there.
fun main() { |
Default parameters
Step1
Can you implement the displayAlertMessage() function in this program so that it prints the output displayed?
fun main() { |
Step 2
Can you find a way to optimize the code with this information so that it prints this output?
There's a new sign-in request on Unknown OS for your Google Account user_one@gmail.com. |
replace the main() function implementation with this one.
fun main() { |
Pedometer
Can you rename the functions, function parameters, and variables in this program based on best practices?
fun main() { |
Fix:
fun main() { |
Compare two numbers
In this exercise, you implement a function that compares the time in minutes that you spent on your phone today versus the time spent yesterday. The function accepts two integer parameters and returns a boolean value.
The first parameter holds the number of minutes that you spent today and the second parameter holds the number of minutes that you spent yesterday. The function returns a true value if you spent more time on the phone today compared to yesterday. Otherwise, it returns a false value.
fun main(){ |
Move duplicate code into a function
fun main() { |
There are many similarities in the code that prints the weather for each city. For example, there are phrases that are repeated multiple times, such as "City:" and "Low temperature:". Similar, repeated code creates the risk of errors in your program. For one of the cities, you may have a typo or you may forget one of the weather details.
- Can you create a function that prints the weather details for a single city to reduce the repetition in the
main()function and then do the same for the remaining cities? - Can you update the
main()function to call the function that you created for each city and pass in the appropriate weather details as arguments?
fun main() { |
Setup Android Studio
New project
In Android Studio, a project template is an Android project that provides the blueprint for a certain type of app. Templates create the structure of the project and the files needed for Android Studio to build your project. The template that you choose provides starter code to get you going faster.
What you need to do is:
- Make sure the Phone and Tablet tab is selected.
- Select the Empty Activity as the template for your project, which only has a single screen and displays the text “Hello Android”.
- Choose a suitable version of Minimum SDK.
Project files
To become familiar with the file structure:
-
the left side is the Project tab. It shows the files and folders of your project. When you were setting up your project, the package name was
com.example.ourhome. You can see that package right here in the Project tab. A package is basically a folder where code is located.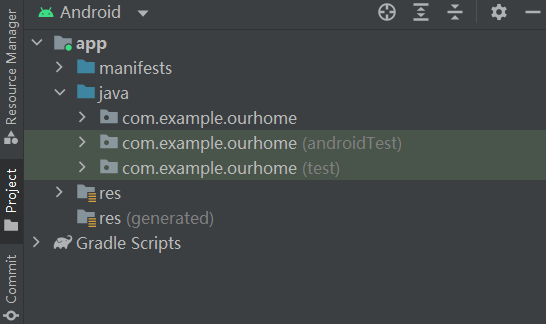
-
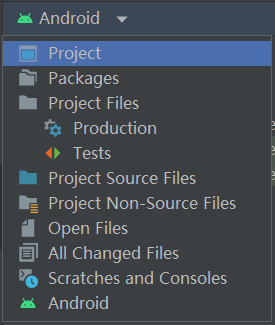
Select Android from the drop-down menu in the Project tab, you can see different view of the project structure. Thanks to the organization of files, we can easily access the files we are working on in our app.
-
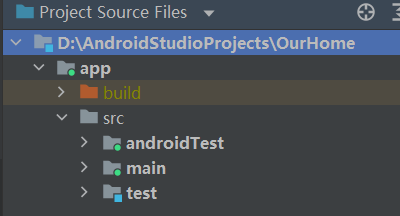
Select Project Source Files from the drop-down menu. We can now browse the files in the same way as in any file browser.
Update the text
Firstly, we focus on the code of the MainActivity.kt . Notice there are some automatically generated functions in this code, specifically the onCreate() and the setContent() funcitons.
class MainActivity : ComponentActivity() { |
-
The
onCreate()function is the entry point to this Android app and calls other functions to build the user interface. -
The
main()function is the entry point/starting point of execution in Kotlin programs. -
The
setContent()function within theonCreate()function is used to define our layout through composable functions. All functions marked with the@Composableannotation can be called from thesetContent()function or from other Composable functions. The annotation tells the Kotlin compiler that this function is used by Jetpack Compose to generate the UI.
|
Next, look at the Greeting() and GreetingPreview() function. They are Composable functions, notice the @Composable annotation above it.
Greeting()function takes in a parameternameand generate what’s shown on the screen.
We notice that:
@Composableannotation is added before the function.@Composablefunction names are capitalized.@Composablefunction can’t return anything.
Just like:
|
Try to update this function to introduce ourselves instead of saying “Hello”.
|
Now, we focus on the GreetingPreview() .
|
GreetingPreview()function is a cool feature that lets us see what our composable looks like without having to build entire app. To enable a preview of a composable, annotate it with@composableand@Preview.@Previewannotation tells Android Studio that this composable should be shown in the design view of this file.@Previewannotation takes in a parameter calledshowBackground. If it is set totrue, it will add a background to our composable preview. Since Android Studio by default uses a light theme for the editor, it can be hard to see the difference betweenshowBackground=trueandshowBackground=false. However, this is an example of what the difference looks like. Notice the white background on the image set totrue.
Try to update this function with our name.
|

Change the background color
To set a different background color for your introduction, you’ll need to surround your text with a Surface. A Surface is a container that represents a section of UI where you can alter the appearance, such as the background color or border.
-
To surround the text with a
Surface, highlight the line of text, press (Alt+Enterfor Windows orOption+Enteron Mac), and then select Surround with widget => Surround with Container . The code will be updated.
fun Greeting(name: String, modifier: Modifier = Modifier) {
Surface(color = Color) { // Delete Box and type Surface() instead, then add a color parameter, set it to Color
Text(
text = "Nice to meet you. My name is $name!",
modifier = modifier
)
}
} -
Notice that there is a red underline. To fix it, we should add a period after it. We will see a pop-up showing different color options. We select the
Cyan.
Add padding
Next, we will add some space (padding) around the text.
A Modifier is used to augment or decorate a composable. One modifier you can use is the padding modifier, which adds space around the element (in this case, adding space around the text). This is accomplished by using the Modifier.padding() function.
We update the Greeting() function.
|
An imports will be added to the import statement section.
import androidx.compose.foundation.layout.padding |
We can see:

Summary
- To create a new project: open Android Studio, click New Project > Empty Activity > Next, enter a name for your project and then configure its settings.
- To see how your app looks, use the Preview pane.
- Composable functions are like regular functions with a few differences: functions names are capitalized, you add the
@Composableannotation before the function,@Composablefunctions can’t return anything. - A
Modifieris used to augment or decorate your composable.
Run app on the Android Emulator
Create an AVD
To run an Android app in an emulator on your computer, you first create a virtual device.
- In Android Studio, select Tools > Device Manager.
The Device Manager dialog opens. If you created a virtual device previously, it’s listed in this dialog.
- Click Create virtual device.
The Virtual Device Configuration dialog appears.
he dialog shows a list of pre-configured devices, organized by category, from which you can choose. For each device, the table provides a column for its display size (in inches), screen resolution (in pixels), and pixel density (number of pixels per inch).
-
Select Phone as the category.
-
Select a phone, such as the Pixel 5, and then click Next.
This step opens another screen where you can choose the version of Android to run on your virtual device. This lets you test your app on different versions of Android.
-
If there’s a download link next to S, click Download > Accept > Next > Finish. The presence of the download link indicates that the image isn’t installed on your computer, in which case you must install the image before you can configure the virtual device. Expect the download to take some time to complete.
-
In the Recommended tab, choose S as the version of Android to run on the virtual device.
-
In the AVD Name field, enter a name for your AVD or use the default. Leave the rest of the fields unchanged.
-
Click Finish.
Run your app on the Android Emulator
- Select the virtual device that you created from the dropdown menu at the top of the Android Studio window.
- Click run.
Build a basic layout
we will use Jetpack Compose to build a simple Android app that displays a birthday message on the screen.
What is Jetpack Compose?
Jetpack Compose is a modern toolkit for building Android UIs. Compose simplifies and accelerates UI development on Android with less code, powerful tools, and intuitive Kotlin capabilities. With Compose, you can build your UI by defining a set of functions, called composable functions, that take in data and describe UI elements.
Composable functions
Composable functions are the basic building block of a UI in Compose. A composable function:
- Describes some part of your UI.
- Doesn’t return anything.
- Takes some input and generates what’s shown on the screen.
Annotations
Annotations are means of attaching extra information to code. This information helps tools like the Jetpack Compose compiler, and other developers understand the app’s code.
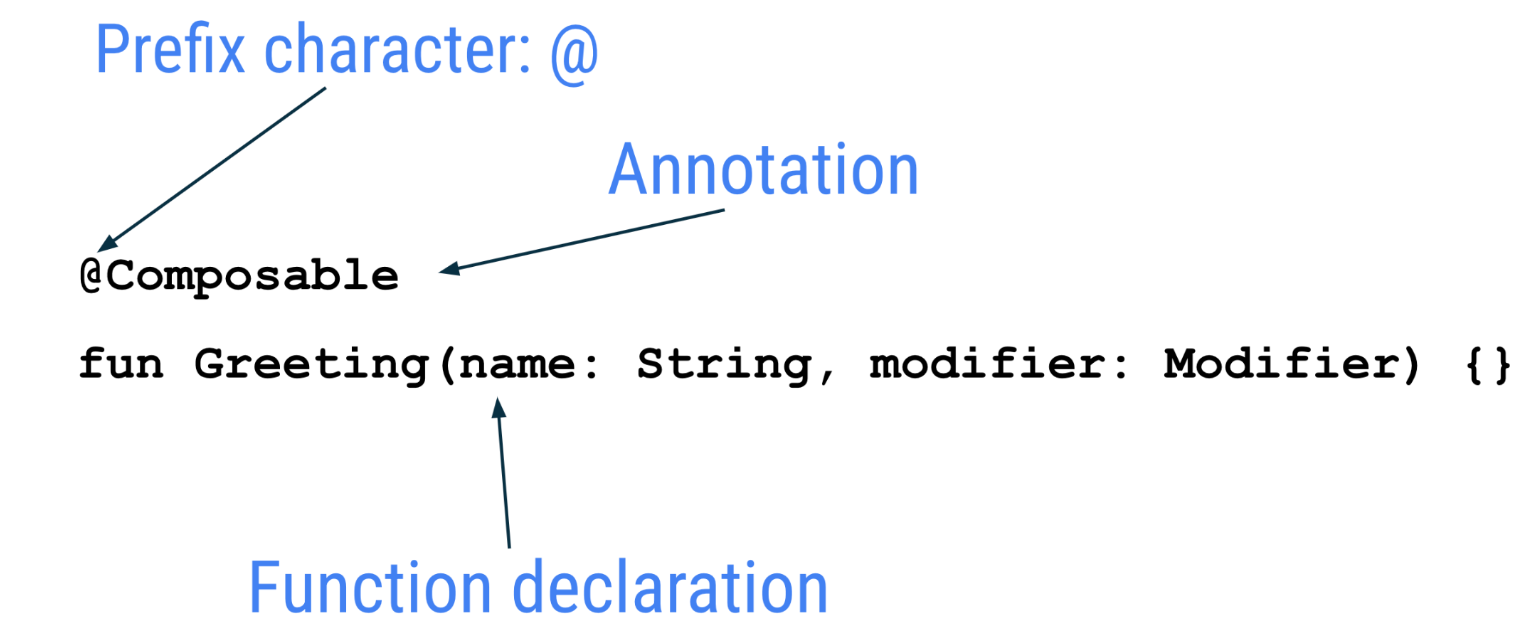
An annotation is applied by prefixing its name (the annotation) with the @ character at the beginning of the declaration you are annotating. Different code elements, including properties, functions, and classes, can be annotated. Later on in the course, you’ll learn about classes.
Annotations with parameters
Annotations can take parameters. Parameters provide extra information to the tools processing them. The following are some examples of the @Preview annotation with and without parameters.
such as:
|
Composable function names
The compose function that returns nothing and bears the @Composable annotation MUST be named using pascal case. Pascal case refers to a naming convention in which the first letter of each word in a compound word is capitalized. The difference between pascal case and camel case is that all words in pascal case are capitalized. In camel case, the first word is not capitalized.
The Compose function:
- MUST be a noun:
DoneButton() - NOT a verb or verb phrase:
DrawTextField() - NOT a nouned preposition:
TextFieldWithLink() - NOT an adjective:
Bright() - NOT an adverb:
Outside() - Nouns MAY be prefixed by descriptive adjectives:
RoundIcon()
Set up a Happy Birthday app
-
Create an Empty Activity project
-
Update our code
fun SayHappyBirthday(name: String, modifier: Modifier = Modifier){
Text(text = "Happy Birthday " + name,
modifier = Modifier.padding(24.dp))
}- It’s a best practice to have our Composable accept a
Modifierparameter, and pass thatmodifierto its first child. For now, add aModifierparameter to theSayHappyBirthday()function. - Add a
nameparameter of typeStringto theSayHappyBirthday()composable function. - Add a
Textcomposable passing in the text message as a named argument.
- It’s a best practice to have our Composable accept a
-
row and column
-
align
package com.example.happybirthday |
-
Add an image: click View > Tool Windows > Resource Manager or click the Resource Manager tab next to the Project window. Click “+” and select Import drawables .
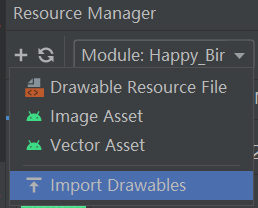
Android devices come in different screen sizes (phones, tablets, and TVs to name a few), and their screens also have different pixel sizes. That is, while one device has 160 pixels per square inch, another device fits 480 pixels in the same space. If you don’t consider these variations in pixel density, the system might scale your images, which could result in blurry images, or large images that consume too much memory, or images that are sized improperly.
When you resize images that are larger than the Android system can handle, an out-of-memory error is thrown. For photographs and background images, such as the current image, the
androidparty.png, you should place them in thedrawable-nodpifolder, which stops the resizing behavior. -
click Next and Android Studio shows you the folder structure in which your image will be placed. Notice the drawable-nodpi folder.

-
Then click Import , there will be a picture in res.

-
Add an Image composable: To display an image in our app, it needs a place to be displayed.
- In the
MainActivity.ktfile, add aGreetingImage()composable function after theGreetingText()function. - Pass the
GreetingImage()function twoStringparameters: one calledmessagefor the birthday greeting and the other callednamefor your signature. - Every composable function should accept an optional
Modifierparameter. Modifiers tell a UI element how to lay out, display, or behave within its parent layout. Add another parameter at theGreetingImage()composable.
Resources in Jetpack Compose
Resources are the additional files and static content that your code uses, such as bitmaps, user-interface strings, animation instructions, and more. You should always separate app resources, such as images and strings, from your code so that you can maintain them independently. At runtime, Android uses the appropriate resource based on the current configuration. For example, you might want to provide a different UI layout based on the screen size or different strings based on the language setting.-
Let’s group these resources. You should always place each type of resource in a specific subdirectory of your project’s
res/directory. As you can see in this example, theres/directory contains all the resources in subdirectories, which includes adrawable/directory for an image resource, amipmap/directory for launcher icons, and avalues/directory for string resources. -
Let’s access these resources. Jetpack Compose can access the resources defined in your Android project. Resources can be accessed with resource IDs that are generated in your project’s
Rclass. AnRclass is an automatically generated class by Android that contains the IDs of all resources in the project. In most cases, the resource ID is the same as the filename.R.drawable.graphic
// R => Auto generated R class
// drawable => Subdirectory in res folder
// graphic => Resource ID (mostly same as filename) -
In the
GreetingImage()function, declare avalproperty and name itimage. -
Make a call to
painterResource()function by passing in theandroidpartyresource. Assign the returned value to theimagevariable.
fun GreetingImage(message: String, name: String, modifier: Modifier= Modifier){
val image = painterResource(id = R.drawable.sunrise_sea)
Image(painter = image, contentDescription = null)
} - In the
-
Add Box layout:
Boxlayout is one of the standard layout elements in Compose. UseBoxlayout to stack elements on top of one another.Boxlayout also lets you configure the specific alignment of the elements that it contains.- In the
GreetingImage()function, add aBoxcomposable around theImagecomposable. - At the end of the
Boxcomposable, call theGreetingText()function, and pass it the birthday message, signature and the modifier
fun GreetingImage(message: String, name: String, modifier: Modifier= Modifier){
val image = painterResource(id = R.drawable.alone_field)
Box {
Image(
painter = image,
contentDescription = null
)
SayHappyBirthday(
message = message,
name = name,
modifier = Modifier
.fillMaxSize()
.padding(8.dp)
)
}
}Notice that the image is as wide as the screen, but the image is anchored to the top of the screen. There’s a whitespace at the bottom of the screen that doesn’t look very attractive. In your next task, you will fill the width and height of the screen, and scale the image to fill the entire screen.
- In the
-
Change opacity and scale the image: to achieve this, we need to use the
ContentScaleparameter.-
Scale Content: You have added the image to your app and positioned the image. Now, you need to adjust the scale type of the image, which says how to size the image, to make it fullscreen. There are quite a few
ContentScaleavailable. You use theContentScale.Cropparameter scaling, which scales the image uniformly to maintain the aspect ratio so that the width and height of the image are equal to, or larger than, the corresponding dimension of the screen.- Add a
ContentScalenamed argument to the image. - Import the
androidx.compose.ui.layout.ContentScaleinterface when prompted by Android Studio. - Check out the Design pane.
Image(
	painter = image,
	contentDescription = null,
	contentScale = ContentScale.Crop	// add this line
)
The image should now fill the entire preview screen.
- Add a
-
Change opacity: to improve the app’s contrast, we can change the opacity of the background image. Use
alphaparameter to the Image Composable and set it to0.5F.Image(
painter = image,
contentDescription = null,
contentScale = ContentScale.Crop,
alpha = 0.5F // add this line
) -
Layout Modifiers: Modifiers are used to decorate or add behavior to Jetpack Compose UI elements. For example, you can add backgrounds, padding or behavior to rows, text, or buttons. To set them, a composable or a layout needs to accept a modifier as a parameter. You can add Modifiers to layouts to position the child elements using arrangement and alignment properties. To set children’s position within a
Row, set thehorizontalArrangementandverticalAlignmentarguments. For aColumn, set theverticalArrangementandhorizontalAlignmentarguments. The arrangement property is used to arrange the child elements when the size of the layout is larger than the sum of its children.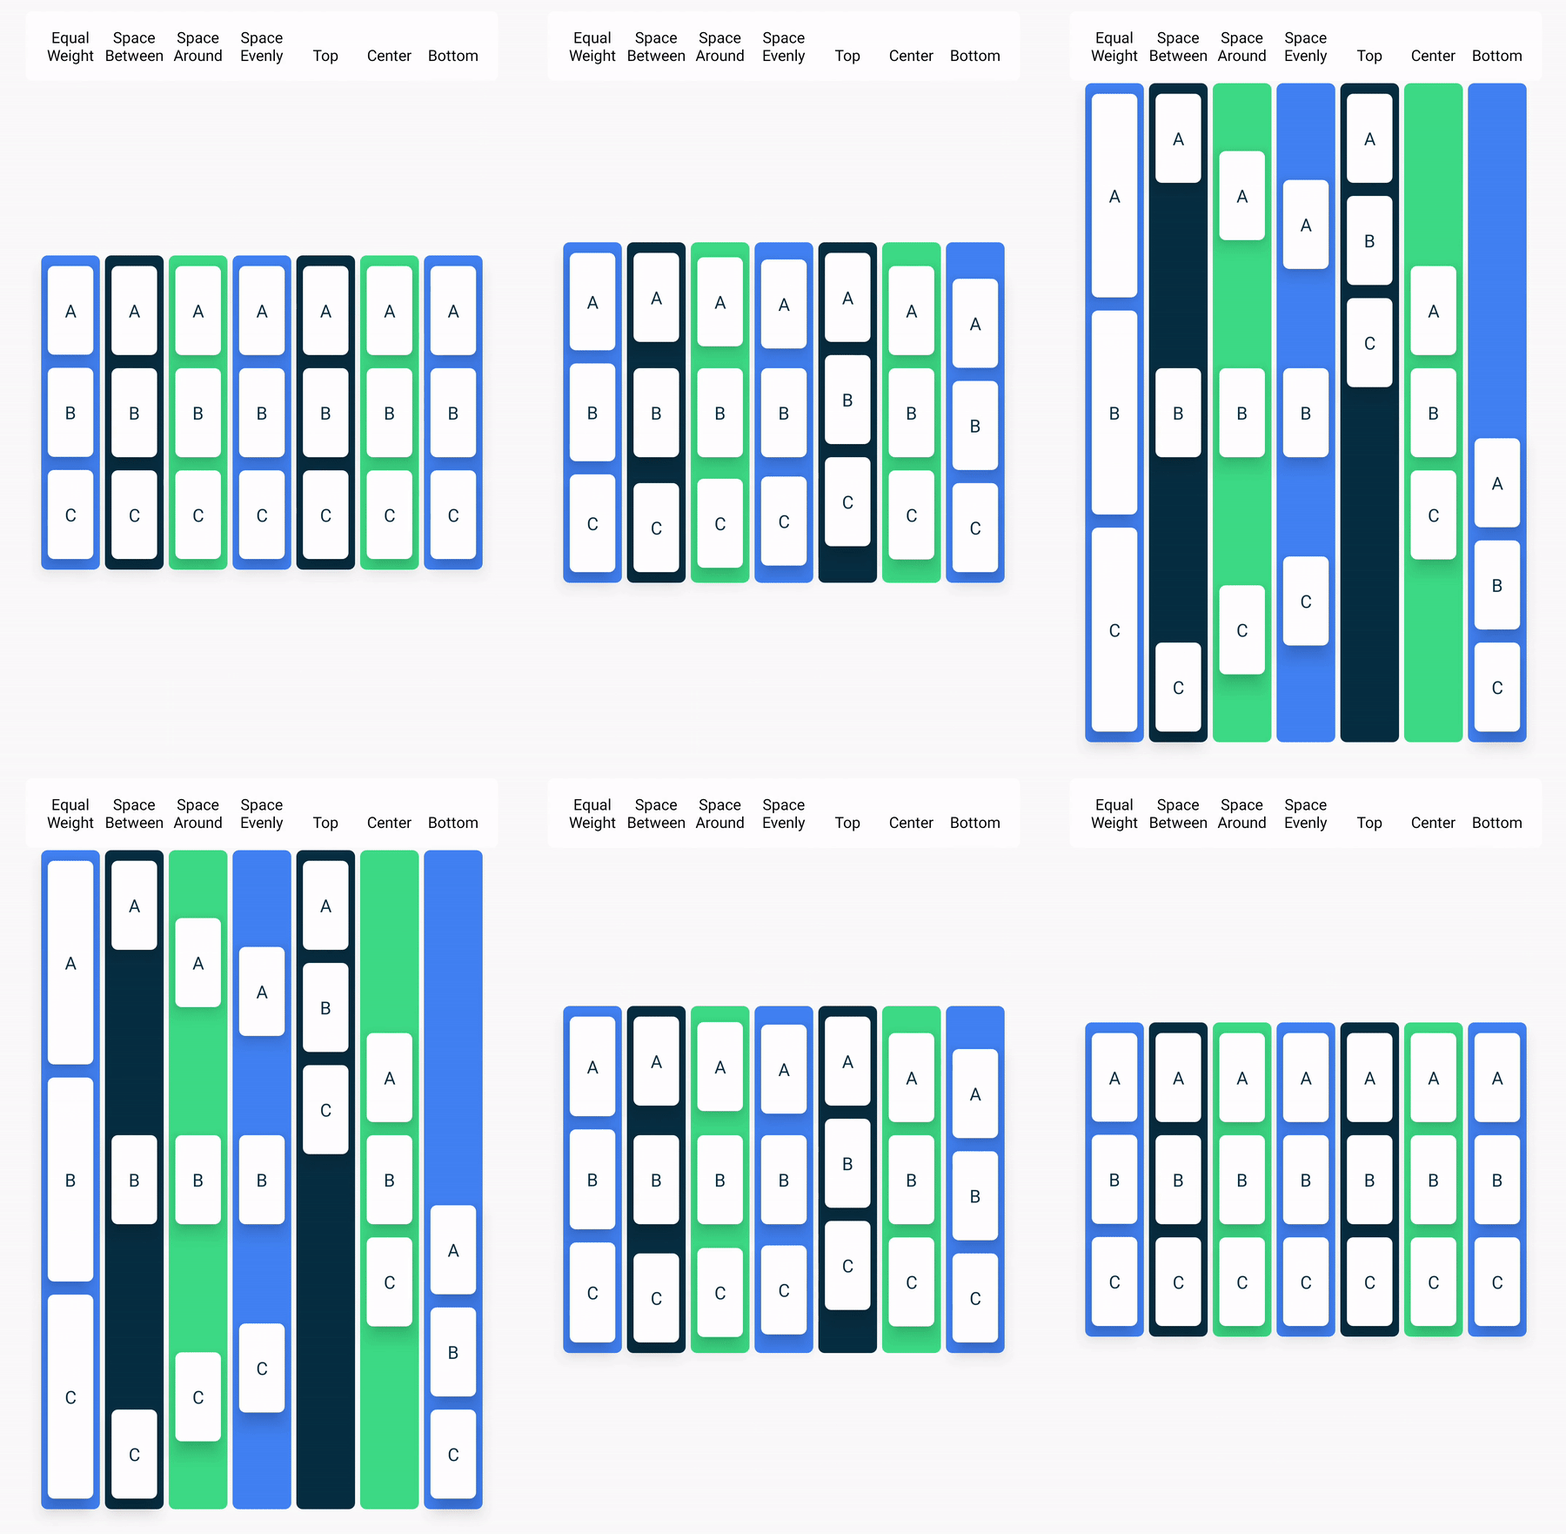
an illustration of different vertical arrangements 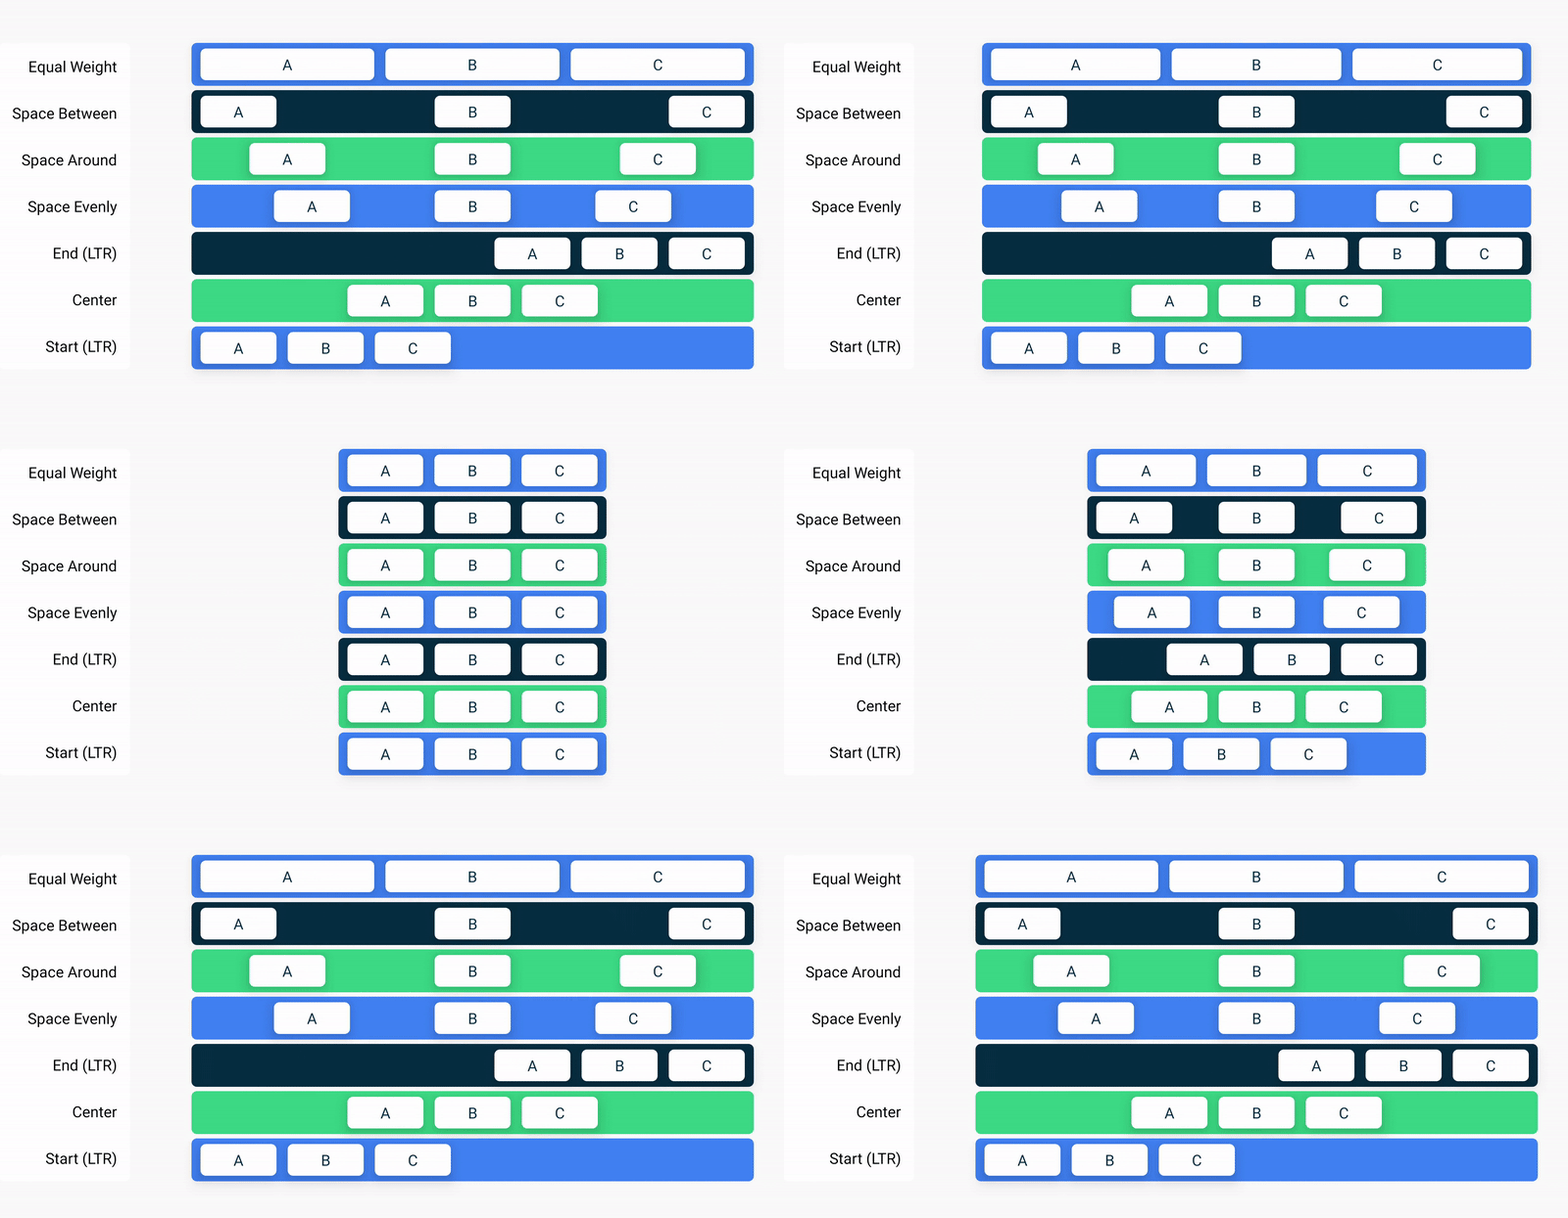
an illustration of different horizontal arrangements
-
-
Align and arrange the text: we will observe the code that you have added in the previous codelab to arrange the text in the app.
- In the
MainActivity.ktfile, scroll to theGreetingText()function. TheverticalArrangementproperty in the column is set toArrangement.Center. The text content will be centered on the screen thus. - A UI element wraps itself around its content. To prevent it from wrapping too tightly, you can specify the amount of padding on each side.
- In the
-
Extract Resource: A hardcoded string is one that’s written directly in the code of your app. Hardcoded strings make it more difficult to translate your app into other languages and harder to reuse strings in different places in your app. You can extract strings into a resource file to resolve these issues. Instead of hardcoding strings in your code, you put the strings into a file, name the string resources, and use the names whenever you want to use the strings. The name stays the same, even if you change the string or translate it to a different language.
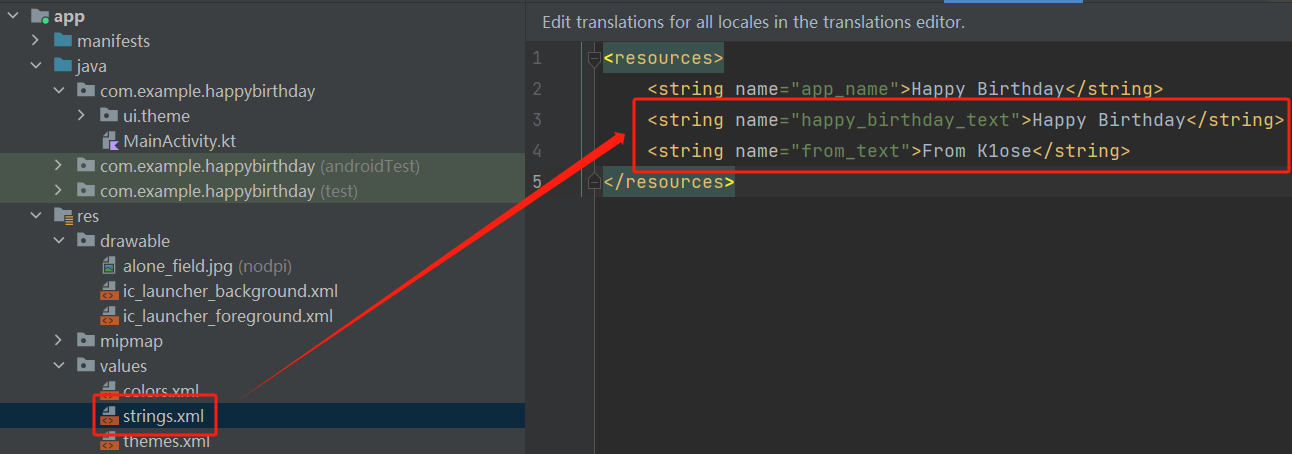
HappyBirthdayTheme {
    // A surface container using the 'background' color from the theme
    Surface(modifier = Modifier.fillMaxSize(), color = MaterialTheme.colorScheme.background) {
        SayHappyBirthday(message = getString(R.string.happy_birthday_text), name  = getString(
            R.string.from_text
        ))
    }
}
Summary
- Jetpack Compose is a modern toolkit for building Android UI. Jetpack Compose simplifies and accelerates UI development on Android with less code, powerful tools, and intuitive Kotlin APIs.
- The user interface (UI) of an app is what you see on the screen: text, images, buttons, and many other types of elements.
- Composable functions are the basic building block of Compose. A composable function is a function that describes some part of your UI.
- The Composable function is annotated with the
@Composableannotation; this annotation informs the Compose compiler that this function is intended to convert data into UI. - The three basic standard layout elements in Compose are
Column,Row,andBox. They are Composable functions that take Composable content, so you can place items inside. For example, each child within aRowwill be placed horizontally next to each other. - The Resource Manager tab in Android Studio helps you add and organize your images and other resources.
- An
Imagecomposable is a UI element that displays images in your app. - An
Imagecomposable should have a content description to make your app more accessible. - Text that’s shown to the user, such as the birthday greeting, should be extracted into a string resource to make it easier to translate your app into other languages.
